Category: Silpat

By the skin of a chicken

If you like fried chicken, or a good roast chicken, and if you share my tastes, I bet you love eating the skin. Its crispness is a sublime mouth sensation, and depending on what type of oil you use when frying, or what you add to the butter or olive oil you use to baste the bird while it is roasting, the flavors of the skin can range widely. (Duck fat? Olive oil/butter mixture? Garlic, shallots, basil, sage, chili powder? The sky is the limit.)

One of the things I learned to do at Restaurant Amador is use the skin alone to make chicken-skin wafers, or chips. (You can ask your butcher to order chicken skins for you, or learn how to skin your own chicken, as it’s really not that difficult. And the skins freeze well, so there is no excuse for not having any on hand.)

What you’ll need: A Silpat or two, a large metal baking sheet, two baking dishes of similar size, some heavy stones, and parchment paper.

Baking stones

Baking stones

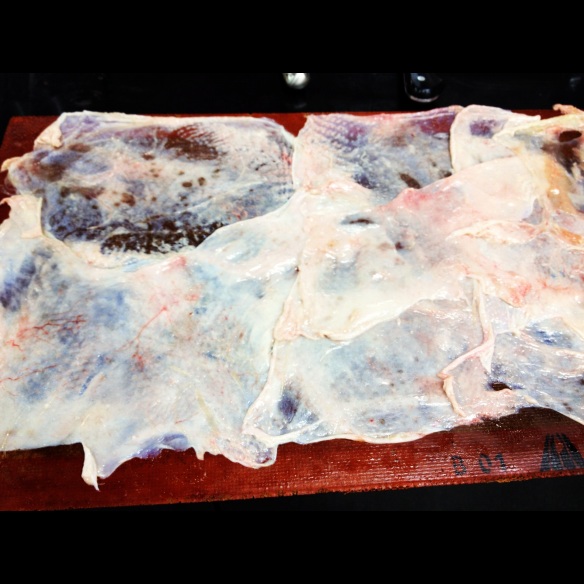
To begin, take a chicken skin and spread it on a cutting board, skin-side down. Then, using a flat, flexible plastic scraper – you can buy these at a cooking-supply store, or make your own – scrape as much of the fat away from the skin as you can. (Have a container near you to scrape the fat into.) You’ll find it impossible to scrape away all of the fat, but get as much as possible without stressing over it. (The less fat, the lighter the taste.) Then, one piece at a time, spread the de-fatted skins, skin side down, on a Silpat, stretching them as much as possible. Repeat this until you have the Silpat covered, making sure to not overlap the skins too much; you want the layer to be as thin as is possible.

Chicken skins, spread on a Silpat

Chicken skins, spread on a Silpat

Repeat the scraping procedure with another set of skins – and don’t worry, this is a fast procedure … once you get going you can de-fat one piece in less than a minute – and, one at a time, spread a skin over the pieces already on the Silpat. Only this time, make sure to put the pieces skin side up. Making sure that the layers are uniform, cover the first layer completely.

The next step is easy: take your other Silpat and place it on top of the chicken skins, then put the assemblage on a baking sheet. Put the baking sheet on the bottom of one of the containers, (the space created by the inverted container helps crisp the skins). Place a piece of parchment paper on top of the Silpat, and on top of the paper put your other baking dish. (The dish needs to be large enough to cover the entire surface of the Silpat sheets.) Into this dish go the stones, which serve to exert pressure on the skins.

A double batch of chicken skins

A double batch of chicken skins

(Do not fret if you don’t have metal pans like the ones in the photo above; improvise with what you have. But do invest, if you have not already, in Silpats; you’ll find yourself using them often.)

With the oven set at 330 Fahrenheit (165 Celsius), put the entire stack on a rack and cook for two hours. Your kitchen will develop a lovely scent.

Next, take the tray containing the stones out of the oven and put it in a safe place, as the stones will retain their heat for a long time. Remove the remaining trays from the oven and put the Silpat sheets on a counter. Slowly peel back the top Silpat and behold your creation: you will discover a crisp, flat layer of chicken skin, with uneven edges. (If you have a food dehydrator, now is the time to dry out your skin. If you don’t, put the skin on a piece of parchment paper and bake it in your oven at a very low temperature, say, 70 degrees Fahrenheit. This step helps give the skin a lighter taste and feel. Leave it in the oven for 30 minutes or so.)

A tasty wafer

A tasty wafer

Finally, it’s time to cut the skin into individual pieces; feel free to use your imagination here, depending on how you plan to use the pieces.

Rectangles of crispy goodness

Rectangles of crispy goodness

At Amador, the skin is cut into rectangles and served as an early course, adorned with purées, creams and herbs. They are delicious. Just take the skins from the oven and place them on a cutting board. Using a sharp knife – of course, you should have nothing but sharp knives – cut the pieces into your desired shape. As a final step, sprinkle with Maldon salt, or your preferred sea salt. You could serve them in many ways, and I know they would be good as a garnish on a bowl of shrimp and grits, perhaps sprinkled with dried shrimp.

Pork on ice

Most people I know love bacon, and most people I know have a strong affection for ice cream. Two years ago I was invited to a Thanksgiving dinner in Dubai – about 40 people were going to be attending. I was asked to bring something for dessert, because the turkeys and hams and gumbo were already taken care of. The hosts were from Texas, and I was happy to accept the invitation, because I had already been fortunate enough to taste D.B.’s slow-cooked pork and beef brisket.

I then got to thinking about what I would make; the year before, A.S. and I had put on a Thanksgiving dinner for about 15 friends and colleagues, and it was a great success. It would be good for a change to not have to brine and cook a turkey and make Scooter’s Southwestern Dressing and struggle to find room in the refrigerator for a 20-pound bird.

However, I knew I would miss working with poultry and pork and giblets and set out to come up with something both savory and sweet for my dessert. After a bit of thought I recalled a pine nut semifreddo recipe I had run across in The Silver Spoon; it is a great dish with which to end a meal – not too sweet, but sweet enough to satisfy, especially if served with a small chocolate cake. So, thinking of pork, and one of my favorite pork products, bacon, I decided to make Pine Nut and Bacon Semifreddo.

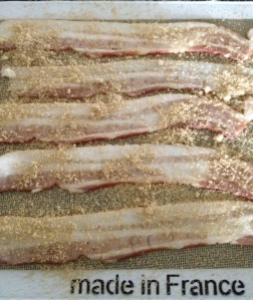
Goodness: Bacon and brown sugar

Goodness: Bacon and brown sugar

I do not want to mislead you into thinking that this dish sprung from my head with no precursor; by now, there is nothing original to do with bacon, and we have enjoyed it in brownies and cocktails and cheese and panna cotta, to name but a few. I also recall, with pleasure, a fine dish I had at a restaurant in Brooklyn that included avocado and bacon ice cream.

That said, my Bacon Semifreddo was a hit that Thanksgiving, so much so that the amount I made fell short of demand, the empty bowl in the middle of the dessert table looking bereft, yet satisfied, as the containers of strawberry and vanilla ice creams around it sat full and forlorn. More than several people asked me if there was more bacon “ice cream” and told me it was the best thing they had tasted that Thanksgiving evening. (I recall fondly, however, a giant pot of gumbo that included homemade andouille that had been brought over from Louisiana … it was as good as the semifreddo, and I am glad it was there.)

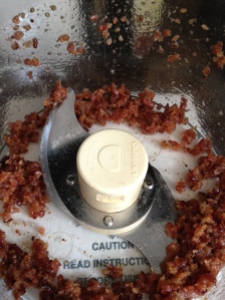
Have you ever pulverized bacon? You should.

Have you ever pulverized bacon? You should.

So, here’s how I make the semifreddo; I use the recipe found in The Silver Spoon (and if you don’t have this book, get it) as a foundation, and add the candied bacon:

Preheat oven to 400F; on a baking sheet lined with aluminum foil or a Silpat, arrange five slices of bacon. Sprinkle 2-3 tablespoons of brown sugar evenly on the slices and cook for 15 minutes or so (until brown), turning the slices midway through the cooking time. Cool bacon on a wire rack. When cool, cut slices and put in food processor with blade inserted; pulse until the bacon is nearly pulverized. Set aside in a bowl.

Next, spread 1 1/4 cups of pine nuts on a baking sheet and roast at 350F for 8 minutes or so, until the nuts are golden; do not overcook. While the pine nuts are roasting, put 1 cup of sugar and 4 tablespoons of water in a heavy pan over medium-high heat. The mixture will bubble and then become a clear syrup. Stir, and wait until the syrup begins to turn a golden brown. Carefully add the roasted pine nuts to the syrup and stir carefully. Coat the nuts evenly, then spread on an oiled cookie sheet. Let cool, then break up the praline and put half in your food processor, reserving the other half. Pulse until very fine. Then, pulse the rest of the praline until crushed, but do not turn it to powder.

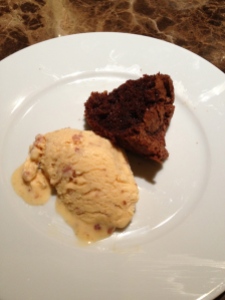
Dessert is served.

Dessert is served.

Now, you proceed to the semifreddo in earnest. You need 1 vanilla bean, 4 eggs, separated, 4 tablespoons of sugar, 1 1/4 cups of heavy cream, and a pinch of salt. Slice the vanilla bean lengthwise and scrape the seeds into a bowl. Add the egg yolks and sugar and whisk until pale. In another bowl (use glass or other nonreactive bowls for this recipe) whisk the cream until you form peaks. (Always use a clean whisk; grease or fats interfere with the process; if you have only one, wash and dry it for each step.) In a third bowl, whisk the egg whites and pinch of salt until thick – I always do the whites last so as to have stiffer peaks.

Now, fold the cream into the yolk mixture, then fold the whites into that. Finally – and if all of this seems laborious, it isn’t – fold in your delicious bacon and the crushed praline. Pour the mixture into an airtight container and freeze until firm. You can make this the day before.

I like to serve the semifreddo with a flourless chocolate cake, but have been known to take the container from the freezer and, using my favorite silver spoon, enjoy as is.

© 2024 Mise en Place

Theme by Anders NorenUp ↑